Create Login System with CodeIgniter MVC Model
Hello, I am a Core PHP programmer and currently learning MVC with codeigniter and bootstrap. So, dont expect some expert level stuff. So Let Begin.
I am not a reader as I want to code quickly, Here is a diagram to help us understand
After understanding the image, it can be presumed that HTML stuff will go to View section. Controllers will be our PHP scripts and boring databases will be in model section. Currently I am using Apache server in WAMP. If I am using MVC, I dont want to use it on simple website. Why should I give myself an headache to adopt it on a simple website? Hence, I am going to use it to create a login system for my own web interface.The framework will create a login system to make my data secure and easily manage of code. I am developing this on version 3.0.2 and this tutorial may not work in later version changes. Here are Simple steps to follow:
What the hell is MVC?
I am not a reader as I want to code quickly, Here is a diagram to help us understand
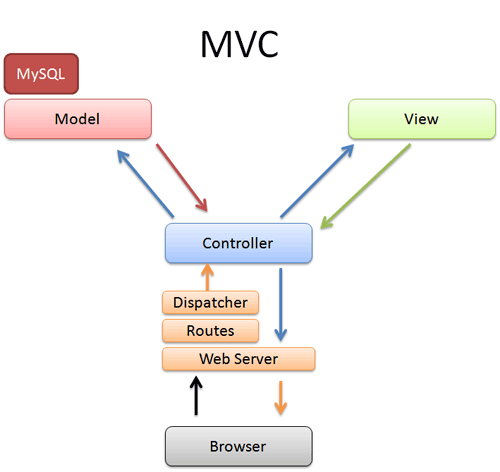 |
| Image taken from betterexplained.com. To read more Click here |
After understanding the image, it can be presumed that HTML stuff will go to View section. Controllers will be our PHP scripts and boring databases will be in model section. Currently I am using Apache server in WAMP. If I am using MVC, I dont want to use it on simple website. Why should I give myself an headache to adopt it on a simple website? Hence, I am going to use it to create a login system for my own web interface.The framework will create a login system to make my data secure and easily manage of code. I am developing this on version 3.0.2 and this tutorial may not work in later version changes. Here are Simple steps to follow:
- Download Codeigniter and unzip it in respective www folder. Thats it. I myself though it would include complex process of modifying PHP extensions, modules and stuff but unzipping the zip installs it. Nothing much complex.
- Now for login you need MySQL. Login in into it, create your database you like and create table below.
CREATE TABLE `users` (
 `id` tinyint(4) NOT NULL AUTO_INCREMENT,
 `username` varchar(10) NOT NULL,
 `password` varchar(100) NOT NULL,
 PRIMARY KEY (`id`)
) ENGINE=MyISAM DEFAULT CHARSET=latin1 AUTO_INCREMENT=1 ; - Add a user.
insert into users (username, password) values (gman, MD5(password));
- Link Codeigniter with MySQL database in application/config/database.php
$db[default] = array(
 dsn => ,
 hostname => localhost,
 username => root,
 password => password,
database => databasename, - Change the route from welcome to login in application/config/routes.php
$route[default_controller] = "login";
- the file application/config/autoload.php loads packages, libraries, helpers, languages and drivers by default. The framework is kept minimalistic. Therefore none of them are activated by default. Add the following libraries and helper required for login system.
$autoload[libraries] = array(database,session);
...
$autoload[helper] = array(url); - Set the encryption key in application/config/config.php. I had no clue what to keep so I generated it from http://jeffreybarke.net/tools/codeigniter-encryption-key-generator/
$config[encryption_key] = J6HHz5G5F02ngqX1phtMFDkYvYshgOtC;
- Configure .htaccess file
<IfModule mod_rewrite.c>
 RewriteEngine On
 # !IMPORTANT! Set your RewriteBase here and dont forget trailing and leading
 # slashes.
 # If your page resides at
 # http://www.example.com/mypage/test1
 # then use
 # RewriteBase /mypage/test1/
 RewriteBase /
 RewriteCond %{REQUEST_FILENAME} !-f
 RewriteCond %{REQUEST_FILENAME} !-d
 RewriteRule $1 !^(index.php|img|images|css|js|fonts|fontrobots.txt)
 RewriteRule ^(.*)$ index.php?/$1 [L]
</IfModule>

<IfModule !mod_rewrite.c>
 # If we dont have mod_rewrite installed, all 404s
 # can be sent to index.php, and everything works as normal.
 # Submitted by: ElliotHaughin

 ErrorDocument 404 /index.php
</IfModule> - Enough Config stuff. Lets get straight to the point yeah! Lets create a User Model by creating User.php as application/models/
<?php
Class User extends CI_Model
{
 function login($username, $password)
 {
 $this -> db -> select(id, username, password);
 $this -> db -> from(users);
 $this -> db -> where(username, $username);
 $this -> db -> where(password, MD5($password));
 $this -> db -> limit(1);

 $query = $this -> db -> get();

 if($query -> num_rows() == 1)
 {
 return $query->result();
 }
 else
 {
 return false;
 }
 }
}
?> - Create a controller for login (application/controllers/Login.php). This controller is just to take you to the login page and not related to login verification. That comes later.
<?php if ( ! defined(BASEPATH)) exit(No direct script access allowed);

class Login extends CI_Controller {

 function __construct()
 {
 parent::__construct();
 }

 function index()
 {
 $this->load->helper(array(form));
 $this->load->view(login_view);
 }

}

?> - The html stuff comes in application/views/login_view.php. Use your js from cdn, css in css folder in root and use base_url(); to link to them.
<!DOCTYPE html>
<html>
 <head>
 <title>Simple Login with CodeIgniter</title>
 </head>
 <body>
 <h1>Simple Login with CodeIgniter</h1>
 <?php echo validation_errors(); ?>
 <?php echo form_open(verifylogin); ?>
 <label for="username">Username:</label>
 <input type="text" size="20" id="username" name="username"/>
 <br/>
 <label for="password">Password:</label>
 <input type="password" size="20" id="password" name="password"/>
 <br/>
 <input type="submit" value="Login"/>
 </form>
 </body>
</html> - Now this is the code that I was unable to get my head around. This controller verifies the login. Add the below code in application/controllers/Verifylogin.php
<?php if ( ! defined(BASEPATH)) exit(No direct script access allowed);

class VerifyLogin extends CI_Controller {

 function __construct()
 {
 parent::__construct();
 $this->load->model(user,,TRUE);
 }

 function index()
 {
 //This method will have the credentials validation
 $this->load->library(form_validation);

 $this->form_validation->set_rules(username, Username, trim|required);
 $this->form_validation->set_rules(password, Password, trim|required|callback_check_database);

 if($this->form_validation->run() == FALSE)
 {
 //Field validation failed. User redirected to login page
 $this->load->view(login_view);
 }
 else
 {
 //Go to private area
 redirect(home, refresh);
 }

 }

 function check_database($password)
 {
 //Field validation succeeded. Validate against database
 $username = $this->input->post(username);

 //query the database
 $result = $this->user->login($username, $password);

 if($result)
 {
 $sess_array = array();
 foreach($result as $row)
 {
 $sess_array = array(
 id => $row->id,
 username => $row->username
 );
 $login_data = array( logged_in => $sess_array );
 $this->session->set_userdata($login_data);
 }
 return TRUE;
 }
 else
 {
 $this->form_validation->set_message(check_database, Invalid username or password);
 return false;
 }
 }
}
?> - Create Homepage controller in application/controllers/home.php
<?php if ( ! defined(BASEPATH)) exit(No direct script access allowed);

class Home extends CI_Controller {


 function index()
 {
 if($this->session->userdata(logged_in))
 {
 $session_data = $this->session->userdata(logged_in);
 $data[username] = $session_data[username];
 $this->load->view(home_view, $data);
 }
 else
 {

 //If no session, redirect to login page
 redirect(login, refresh);
 }
 }

 function logout()
 {
 $this->session->unset_userdata(logged_in);
 session_destroy();
 redirect(home, refresh);
 }

}

?> - Finally, add a view of home in application/views/home_view.php
<!DOCTYPE html>
<html>
 <head>
 <title>Simple Login with CodeIgniter - Private Area</title>
 </head>
 <body>
 <h1>Home</h1>
 <h2>Welcome <?php echo $username; ?>!</h2>
 <a href="home/logout">Logout</a>
 </body>
</html>


