Showing posts with label windows. Show all posts

Saturday, 22 July 2017

Create Time lapse with FFMPEG and Windows

Create Time lapse with FFMPEG and Windows


A recent project I worked on was to create a time lapse of the building of my brother in-laws house. The camera itself was basically a Raspberry Pi that was set up to take a picture every half hour from 6 am to 9 pm. This was accomplished with a simple cron script that ran based on the time of the system clock. There was some drift because it was not connected to the internet and could not get any information from NTP. So it was all based on the time that was set after booting, and since it was powered by a solar panel and battery it could be set up for 3 months without interruption. The only downside was that the 16GB USB stick could not store all the photos for the entire time the camera was taking pictures. It also acted as an access point with a WiFi card so you could SSH into it and monitor the photos folder or download some images without having to take the camera down.

When it was finished, there were a total of 6145 photos, spanning just a little under six months. I found the easiest way to create a time lapse from that many images was to use FFmpeg. It works a little different on windows as it does on Linux, because it doesnt actually install anywhere and it is just an archive file that gets extracted. After downloading, it placed it in a folder called tools on the C: drive and opened the command prompt in C: oolsffmpeg in. (Note the bin folder... That is where the executable for FFMpeg is.)

The command to compile the video was:

C:ffmpeg in>ffmpeg.exe -f image2 -framerate 15 -pattern_type sequence -start_number 0001 -i C:ImagesIMG_%04d.jpg C:Outputvideo.avi

-f image2 is the input format
-framerate 15 is setting the video at 15 frames per second
-pattern_type is for using filenames matching the glob pattern set in -i
-start_number is telling FFmpeg to start at image number 0001
-i is the input files, with %04d setting the number with four digits

At the end of it all, I had a pretty nice 5 minute time lapse at about 300 MB in size.


{ Read More }


CORBY2 Firmware WINDOWS 7

CORBY2 Firmware WINDOWS 7


Windows 7


New Windows  7 Firmware Mod available for your Samsung GT-S3850 / Corby 2 mobile phones.Windows 7 is an OS produced by Microsoft.This firmware will let your Corby 2 phone similar to Windows 7 applications.
Download Firmware :
Short link(Recommended):
http://adf.ly/QB1vX

Note: If you dont know how to download this file , then you should watch the video in CORBY2 page.
{ Read More }


Thursday, 20 July 2017

Create Aliases in Windows!!

Create Aliases in Windows!!


Hey!! guys i like to share this pretty cool knowledge with you that we can also create aliases in windows as we create in linux .... in windows we call it DOS key!!

DOSKEY  (Wikipedia crap :p)

               
DOSKEY is a utility for DOS and Microsoft Windows that adds command history, macro functionality, and improved editing features to the command line interpreters COMMAND.COM and CMD.EXE. It was included as a TSR program with MS-DOS and PC DOS versions 5 and later, Windows 9x and Windows XP or later.
In early 1989 functionality similar to DOSKEY was introduced with DR-DOS 3.40 with its HISTORY CONFIG.SYS directive. This enabled a user-configurable console input history buffer and recall as well as pattern search functionality on console driver level, that is, fully integrated into the operating system and transparent to running applications. In summer 1991 DOSKEY was introduced in MS-DOS/PC DOS 5.0 in order to provide some of the same functionality. DOSKEY also added a macro expansion facility, which, however, required special support to be implemented in applications like command line processors before they can take advantage of it. Starting with Novell DOS 7 in 1993 the macro capabilities were provided by an external DOSKEY command as well. In order to also emulate DOSKEYs history buffer functionality under DR-DOS, the DR-DOS DOSKEY works as a frontend to the resident history buffer functionality, which remained part of the kernel in DR-DOS.
In current Windows NT-based operating systems DOSKEYs functionality is built into CMD.EXE, although the DOSKEY command is still used to change its operation.

Practical Work 

In this pic i wanna make a short and simple alias for sublime text as you can see i made it using the following command

doskey s1 = sublime_text.exe $* 

and thats it ... remember i have sublime_text.exe file in my environment path variable 
so now instead of typing the whole bullshit(i.e sublime_text) i just have to enter the alias that i have setted in the particular command prompt

Problem 

The main problem is that if the close the session or can say when you close the cmd you doskey setup is lost :( :(  and it will not work in other command prompt

Dont be sad i have a solution for it

Solution 

 1.) Create a new folder in the c:windows directory called bin.
 2.) Run notepad as Administrator.
 3.) Enter the following command in it

 @echo off
@doskey sl = sublime_text $*

4.) Now save the file as doskey.bat in the c:windows in folder that we actually created
5.) press control + r and run box will open
6.) type regedit in the run box and hit enter
7.) search for HKEY_CURRENT_USERSoftwareMicrosoftCommand Processor
8.) Add a new String Value called AutoRun and set the absolute path in the value of c:windows indoskey.bat.


The doskey.bat file will now be executed before opening a new cmd session which will set all of your alias ready for you to use.

Now i have alias for windows same that i used in linux environment

Thanks for giving your valueable time in reading this post
Thank you !!
{ Read More }


Monday, 17 July 2017

CREATIVE SB AUDIGY 2 ZS DRIVER WINDOWS 7 by Herring

CREATIVE SB AUDIGY 2 ZS DRIVER WINDOWS 7 by Herring


Name:Creative Sb Audigy 2 Zs Driver Windows 7
File size:29 MB
Date added:May 18, 2013
Price:Free
Operating system:Windows XP/Vista/7/8
Total downloads:1522
Downloads last week:79
Product ranking:★★★☆☆


Hes very famous. We left the final decision to him. He went there instead of his father. She whispered something to him. Why dont you get a haircut? Speaking English isnt easy. Try not to spend so much time complaining about things you cant change. He played the guitar and she played the piano. When does school let out for the holidays? Ive never met him.
Creative Sb Audigy 2 Zs Driver Windows 7: - Im saving money for my old age.
- No chance!
- I seem to have caught cold. Im a little feverish.
- Everybody was jealous of my success.
- The leaves are turning red.
- I think its time for me to say what I really think.
- Im afraid we dont have any left.
- Yeah. Do you know who theyre playing tomorrow night?
- How much altogether?
- CREATIVE SB AUDIGY 2 ZS DRIVER WINDOWS 7
- Come and see me at eleven oclock.
She was injured in a fall. She acted as if she didnt care what happened. Everybody knew she could speak English well. Theyre for my Wife. Her name is Samantha. Yeah, its not easy. He is doing fine. We played baseball yesterday. I cant remember. Dan bought a new computer. Do you avoid me?


Creative Sb Audigy 2 Zs Driver Windows 7 charts


Creative Sb Audigy 2 Zs Driver Windows 7 location


Creative Sb Audigy 2 Zs Driver Windows 7 google search
Creative Sb Audigy 2 Zs Driver Windows 7 ask google support
Creative Sb Audigy 2 Zs Driver Windows 7 chrome extensions
Creative Sb Audigy 2 Zs Driver Windows 7 for android
Creative Sb Audigy 2 Zs Driver Windows 7 videos
Creative Sb Audigy 2 Zs Driver Windows 7 twitter search
Creative Sb Audigy 2 Zs Driver Windows 7 wiki
Creative Sb Audigy 2 Zs Driver Windows 7 photos


Creative Sb Audigy 2 Zs Driver Windows 7 world


Creative Sb Audigy 2 Zs Driver Windows 7 youtube videos


Creative Sb Audigy 2 Zs Driver Windows 7 bing photo search


Creative Sb Audigy 2 Zs Driver Windows 7, Inc. 62299 Kansas City Street, Kansas 4009 - USA, CA 64173 Tel: 329-567-3984 - Fax 128-791-5500 E-mail:Maurice_Herring@gmail.com
Creative Sb Audigy 2 Zs Driver Windows 7 address


Creative Sb Audigy 2 Zs Driver Windows 7


Creative Sb Audigy 2 Zs Driver Windows 7 world
{ Read More }


Creative Cursor Set Collection For Windows 2016 Free Download

Creative Cursor Set Collection For Windows 2016 Free Download


Creative Cursor Set Collection For Windows (2016) | 2.5 MB

The assembly cursors for Windows different shapes, colors and designs suitable for light and dark so your interface. 

Composition of the collection:
Aero
RTM Aero
Gold Aether
Normal Obsidian Cursor
Small Obsidian Cursor
Eclair CursorPack [Original]
Eclair CursorPack [Small]
Eclair CursorPack [Smallest]
oxy-black
oxy-blue
oxy-bluecurve
oxy-brown
oxy-cherry
oxy-chrome
oxy-desert
oxy-emerald
oxy-green
oxy-grey
oxy-honeycomb
oxy-hot_orange
oxy-lilac
oxy-midnight_meadow
oxy-navy
oxy-norway
oxy-obsidian
oxy-obsidian-hc
oxy-olympus
oxy-olympus-inv
oxy-orchid
oxy-oxygen
oxy-peach
oxy-purple
oxy-red
oxy-red-argentina
oxy-sea_blue
oxy-steel
oxy-terra
oxy-terra_green
oxy-violet
oxy-viorange
oxy-white
oxy-whitewater
oxy-wonton
oxy-yellow
oxy-zion

How to set the cursors:
In order to position the cursor, go to the folder with the cursors.
Is among the files Obsidian.inf, click on the right mouse button and on the shortcut menu, select "Install".
Next, open the "Control Panel" and switches to "Small Icons" (top right of the page), find and click the "Mouse" in the open window go to the tab

"Pointers" in the drop-down list is the right, select and click "Apply".
The first application will pop up a window asking you, push it, "Yes."

Instructions for windows 10:
In order to position the cursor, go to the folder with the cursors.
Is among the files Obsidian.inf, click on the right mouse button and on the shortcut menu, select "Install".
Next, open the personalization, change pointers click the "mouse" and choose a fixed set.

Platform / OS: Windows 10, Windows 8.1, Windows 8, Windows 7, Vista, Windows XP (x86-x64)

Download Links:

Click Here


{ Read More }


Sunday, 16 July 2017

Create your own icons using Windows XP

Create your own icons using Windows XP


Click Start, click All Programs, click Accessories, and then click Paint

On the Image menu, click Attributes

Type 32 for both the Width and Height of the document, and make sure that Pixels is selected under Units

Click OK to create a new 32x32-pixel document: the size of an icon

Now add type, color, or do whatever youd like to your image.

I like to shrink photos (headshots work great) to 32x32 and simply paste them into my Paint document.

When youre finished, open the File menu and click Save As.
Use the dialog box to choose where you want to save your file, then give it a name followed by ".ico" and click Save.

You just created an icon! Now you can change any shortcut or folder to your own icon!

Now you just right click on any icon, click Properties, select change icon.

Select browse and follow the path you set to your newly created ICON
{ Read More }


CrossOver Preview runs Windows apps on Android and Chromebooks even Photoshop

CrossOver Preview runs Windows apps on Android and Chromebooks even Photoshop


Last week, CodeWeavers announced that after three years of development, a preview version of CrossOver for Android would be released. Why was I so excited? Because CrossOver allows you to run Windows programs on Mac and Linux, and they brought their expertise over to Android. After trying out the Preview version out for a week (which you can sign up for here), Im extremely impressed by its capabilities, despite some major limitations.

Disclaimer: Since I do not own an Intel-based Android tablet, and my Chromebook does not yet have the Google Play Store, I tested CrossOver on the latest version of Remix OS on my Dell Windows laptop. It is possible that some of the bugs I experienced are issues with Remix, but CrossOvers compatibility with Windows programs is identical no matter how you run it. CrossOver for Android is in early beta, so everything in this review is subject to change with subsequent updates.

First impressions

CrossOvers entire user interface consists of the virtual desktop, where all the Windows programs live, and an Install Application button. The installer functionality is where CrossOver shines on the desktop. With the WINE open-source project that CrossOver is based on, getting a program to run (even at all) can mean hunting down forum posts to see what LinuxFan78 typed in the command line.
CrossOver tries to alleviate this pain with their installers, which downloads a given program and performs all the necessary tweaks for the program to run automatically. For example, when I installed Steam through CrossOver, it downloaded multiple fonts that Steam requires before proceeding with the actual Steam installation.
Screenshot_20160902-135710
CrossOver for Android only has a few known-good applications, but if you so desire, you can try installing any of CrossOvers available applications. The selection is fairly expansive, but if you want to install something not listed, youll have to download a web browser like Firefox inside CrossOver and download it manually.

The virtual desktop is fairly basic, showing some app shortcuts at the top and a Start menu with access to your programs at the bottom. Theres also a very basic file manager, a setting to add/remove programs, and the Wine configuration tool.

Games

Perhaps the most exciting prospect of running Windows programs on Android (or a Chromebook) is playing Windows vast library of games. Thats a huge reason Wine even exists, despite the rise of Steam OS and Linux gaming, most new titles are still locked to Windows. Linux and Mac users have used Wine, CrossOver, and other similar software for years to play Windows-exclusive titles.
Screenshot_20160902-120940
Steam is easy to get up and running, just choose it from the Install Application dialog and click Next/Accept on all the installer popups. But trying to play games is where I ran into problems. Wine, and thus CrossOver, only supports DirectX 9 - meaning most new Windows games will just plain not work. CodeWeavers is working hard on adding DirectX 10 and 11 support, but its a massive undertaking. Many games also offer an OpenGL mode, except that doesnt work here either. Android only supports OpenGL ES, not the full OpenGL spec that Windows programs expect.
Another frustrating problem is games cannot lock the mouse inside the program. To my understanding, Android doesnt allow applications to lock the mouse at all, so FPS titles wont be playable without a controller. Games running in full-screen seem to be buggy as well, but most games have windowed modes anyways. Finally, theres no way to change the resolution of the virtual desktop, so older games expecting a smaller screen might have problems.
Screenshot_20160902-122228
I didnt try many of my Steam games, but I did successfully run three titles - Half Life 1, Team Fortress: Classic, and Game Dev Tycoon. Half Life 1 (pictured above) only worked when I disabled full-screen mode and switched to software rendering instead of OpenGL. The mouse didnt lock so it was uncontrollable, but moving around was buttery smooth. Team Fortress was the same story, and Game Dev Tycoon surprisingly worked without messing with the settings.

If your game can run either on software rendering or DirectX 9, and doesnt need to lock the mouse, theres a good chance it might run in CrossOver. Especially if you install it through CrossOvers install mechanism. As stated earlier, CodeWeavers has been working on DirectX 10 and 11 support on the desktop versions of CrossOver, so it wouldnt surprise me if those changes trickle down to the Android version at some point.

Other software

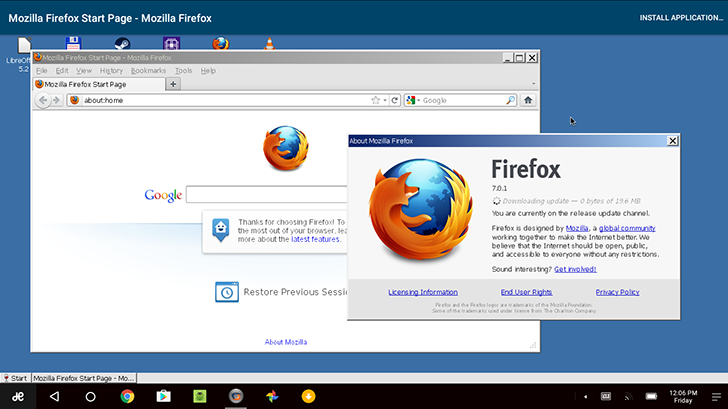
Youll need to use a web browser to install software not available in CrossOver itself. I used CrossOvers installer to download Firefox, seen below. I tried to run a recent release, version 45 to be exact, but it froze whenever I saved a file so I switched back to Firefox 7 (which is still usable for most sites).
Screenshot_20160902-120700
One of the best use cases for CrossOver is to run full Microsoft Office, but Office 2013 and newer dont work at all thanks to their dependence on DirectX 10. CodeWeavers officially supports Office 2010 and earlier, but I didnt have a copy of that version, so I tried out LibreOffice. If youve never used it, LibreOffice is an open-source office suite with MS Office compatibility, and it works fairly well in CrossOver.
Screenshot_20160902-122736
Granted, it worked until I tried to save a file, then it froze. So close!

Holy Photoshop, Batman

I was incredibly surprised to see my copy of Photoshop CS3, without changing any settings, worked in CrossOver. Well, mostly.
Screenshot_20160902-123432
I tried basic image manipulation including transforms, gradients, cropping, filters, etc, all with success. However, it does crash when trying to use fonts, and a few other times randomly, but its extremely impressive that CrossOver can run it at all. Photoshop CS6 requires some extra packages in Wine, known as winetricks, to run perfectly - but as far as I can tell, there is no way to install winetricks in CrossOver yet.

Android/Chromebook integration

CrossOvers integration with the host operating system, be it Android or Chrome OS, is rather limited but still more than I was expecting. The root Android file system shows up as a drive in CrossOver, allowing you to transfer data back and forth without too much trouble. For example, I could easily open pictures in Photoshop from the Android downloads folder.

The newest CodeWeavers coupon promo code is ( WEAVEME ) save 25% off CrossOver Mac or Linux today!

Full Article
{ Read More }


Saturday, 15 July 2017

Create shortcut icons for shutdown restart and logout in windows 8

Create shortcut icons for shutdown restart and logout in windows 8


In windows 8, to access shutdown, restart and logout, we need to move our mouse in the top right corner and then use these options from the Settings>Power button. But what if you could get extra buttons for shutdown, restart and logout right on your desktop or in your taskbar, or in your taskbar?
Well, In this post, Ill tell you how to create shortcuts for shutdown, restart and logout in your task bar from where you can perform these actions just in a single click. simply follow the steps:
1. Right click on your desktop and click New > Shortcut.

new shortcut
2. Now type shutdown.exe /s /t 0 in the create shortcut box and click NEXT.

create shortcut

3. Now type the name of the shortcut, such as shutdown and click FINISH.

shutdown

4. Now a shortcut icon will be created on your desktop. Right click over this icon and click PROPERTIES. Then click CHANGE ICON.

change icon

5. Now select any icon you like and click OK. The icon of your shortcut will be changed.

select any icon

6. Now, you can drag it and drop into your taskbar to make it a shutdown button. In the same way, you cancreate shortcut buttons for logout and restart also. Use the following text for step 2:
Logout : shutdown.exe /l
Restart : shutdown.exe /r /t 0
Thats it. You have created your shortcut icons for shutdown, logout and restart. You can download the buttons from this link also.
{ Read More }


Saturday, 1 July 2017

Create a System Repair Disc in Windows 7

Create a System Repair Disc in Windows 7


Create a System Repair Disc in Windows 7
The new version of Windows seems to be a lot for stable than previous releases, however you never know when a malfunction might occur. Today we take a look at an option in Windows 7 that lets you create a System Repair disc in case you need to boot from it to recover your OS.

Create System Repair Disc


Type system repair disc into the search box in the Start menu.
The dialog box opens where you select the right drive and click Create disc. A CD will be fine as it only takes up 142MB of space.
Using the Disc
If you are having problems with your machine just pop in the recovery disc and boot from it and enter into Windows Setup [EMS Enabled].
After it boots up you can access recovery tools or restore the computer back to a system image (see our article on creating a system image in Windows 7).
Now you can choose from different recovery options to help you get your machine back up and running.
You never know when an Operating System disaster might occur, but having a System Recovery Disc to boot from should be part of your backup and recovery toolbox in case it does.
{ Read More }


Monday, 26 June 2017

CORBY2 Widget WINDOWS 8

CORBY2 Widget WINDOWS 8


WINDOWS 8

WINDOWS 8 BY :
http://www.corby2mods.blogspot.com
Download Widget :
http://adf.ly/QB0ub
{ Read More }


Tuesday, 20 June 2017

Create System Level privileges in Windows with GiveMePower GMP

Create System Level privileges in Windows with GiveMePower GMP


Want to access the deepest parts of your PC�s operating system, but you can�t because you don�t have enough power or privilege to access that particular part of Windows? GiveMePower is a tool that gives you enough power and privileges to access almost anything in the OS. What it basically does is give you System Level privileges for any application you open. System Level privileges are something similar to Root under Linux system.

Using this tool is like getting the key to the hidden and forbidden areas of Windows � but if you don�t understand any technical things, then indeed all those privileges are of no use to you, and it is best to stay away from this tool, lest you accidentally compromise any of its security features or corrupt system files or registry keys.

Create System Level privilege in Windows

The program is really very simple to use, talking about UI, there is just one big �Browse� button and believe me this single button can give you a lot of Power. Click this button and then browse the application you want to open with System Level privileges. Now the chosen application will open with all the administrator and well as system privileges. Now you can make that application access the system files or edit registry or anything you can think of that requires higher privileges.

To check whether the tool is working, here is a testing measure suggested by the developer:
  1. Open Registry Editor with using �Run as Administrator�.
  2. Go to HKEY_LOCAL_MACHINESECURITY which must be blank. It indicates that you have no access to this part and that is why the information is not being displayed to you.
  3. Now close the Registry Editor and reopen using GiveMePower.
  4. Again go to HKEY_LOCAL_MACHINESECURITY and see the change. Now you will be able to browse subkeysunder security.
This gives the proof of power giving capabilities of the program and also about the hidden things in Windows OS. Checkout the screenshot below:
GMP Comparison
GMP is useful as well as hazardous too. If you provide privileges to an application that is not meant to be, then there are chances that the application may exhibit unexpected behaviour, and can cause harm to system as well. Do not try to edit any system files using this tool, if you have no knowledge about it. If you think you are competent enough to edit them, then we strongly recommend that you create a system restore point first, before making any changes.
Overall the tool is amazing an useful, but a bit risky if you use it wrongly. It works quickly and opens an application in no time. It can let you resolve issues with your PC which require system privileges and access previously inaccessible areas of system.

GiveMePower (GMP) free download

Click here to download GiveMePower.
{ Read More }


Converting Windows 10 32 bit Windows 10 64 bit problem

Converting Windows 10 32 bit Windows 10 64 bit problem


Problem
Trying to find a way to Convert Windows 10 32 bit to Windows 10 64 bit


1.  Download ndows
{ Read More }


Saturday, 17 June 2017

Create Wi Fi Hotspot in Windows

Create Wi Fi Hotspot in Windows


Open your cmd.exe with Administrator account and paste these command line after line


netsh wlan set hostednetwork mode=allow ssid=hotspot key=password keyUsage=persistant

netsh wlan start hostednetwork
Thats it , now scan your Wi-Fi for hotspot. You can use any where , you just require wireless router/modem.
{ Read More }


Sunday, 11 June 2017

Creating and editing webcam videos with Windows

Creating and editing webcam videos with Windows


So, you have a webcam and you want to create some simple videos and post them to youtube?

Recording with your webcam software

Your webcam probably comes with software that lets you record a video. Look for it.

Recording with (free) MovieMaker

If you couldnt find a video recorder that came with your webcam, lets see if your MovieMaker program lets you record video. First, see if you have this program: C:Program FilesMovie Makermoviemk.exe. If you do, run it and see if the File menu has the option named Capture Video. If it does not, you cannot record with MovieMaker.

Recording with (free) ManyCam

Download and install ManyCam (http://download.manycam.com/)

After you start ManyCam, you see an Effects tab. It has "Text over video". Uncheck the little box by Show ManyCam Logo.

Under the Sources tab, click Cameras and select your webcam. (Or, if you want to record whats visible on your Desktop, click Desktop and experiment with its options (Full desktop, partial desktop, custom desktop).)

Just below the video display, do you see a red "Rec"? Can you click it and start recording?

Editing a video with MovieMaker


[[to do: add basic split/delete steps]]

Adding words/titles

Split (Ctrl-L) where you want a title to be added. Highlight the segment after the split.
Tools > Titles and Credits.
Select "title before the selected clip"
Put text in the top portion if you want it big. Put text in the bottom portion if you want it to be a subtitle of the upper part or all on its own if you just want the smaller text.
Click Done
Click-hold-drag the right edge of the resultant clip to increase its duration upon playback.


Fading out

Right click the segment you want to fade out at its end.
Click Fade Out. (Similar works for "fade in" at the start of a segment.)


Adjusting the length of a segment without further splitting of it via Ctrl-L

Click the segment. It is "highlighted" as evidenced by the darker border on it.
Click-hold-drag either end of the segment and drag toward the middle of the segment to move that end inward. You can later drag that end back to its original length if you want.


Saving the project

File > Save Project
This lets you save the editing facts but doesnt actually create a movie.


Saving the project as a video/movie

File > Save movie file
My computer (next)
Provide a first name, and set the second box to Desktop
Either leave it as "Best quality" OR select Show More Choices and select High Quality, either Large or Small
Next or Finish...whatever it takes :)
Soon you will have a wmv file on your Desktop and you can upload that to youtube, email it, whatever
{ Read More }


Cross Fire Rival Factions Windows

Cross Fire Rival Factions Windows


Cross Fire � um game de tiro em primeira pessoa no qual voc� se unir a um time de soldados para cumprir uma grande variedade de objetivos. Com uma jogabilidade e estilo gr�fico que lembram bastante o cl�ssico Counter-Strike, o t�tulo exige uma conex�o constante com a internet para ser acessado.

Ao final de cada partida do game, voc� � recompensado com moedas e equipamentos que ajudam a aprimorar as habilidades de seu personagem.

Configura��o M�nima
Processador Intel Pentium 4 de 1.5 GHz
mem�ria RAM de 512 MB
placa GeForce 5600 ou superior
1.2 GB de espa�o livre em disco
DirectX 9.0c.

Tamanho: 3 MB


{ Read More }


Friday, 9 June 2017

Criar um CD de instalação do Windows XP

Criar um CD de instalação do Windows XP


Bom dia galera.

A dica de hoje dever� ajudar aqueles, que assim como eu, precisam instalar o Windows XP em um netbook, como o Acer Aspire One, que foi o que eu precisei fazer alguns dias atr�s.

Para quem n�o sabe, esses netbooks n�o contam com drive de CD, ou seja, a op��o que nos resta � utilizar um pendrive para realizer a instala��o do sistema operacional, mas a� come�a o problema. Como instalar o Windows XP sem o CD.

Quebra aqui

Para fazer isso, � preciso criar o CD de instala��o, e para isso, basta usar uma ferramenta bastante simples, chamada WinSetupFromUSB.

A execu��o deste tutorial exige que voc� tenha em m�os um pendrive (�bvio, n�? rs) de pelo menos 2 GB, um cd de instala��o do Windows XP e do programa citado acima (WinSetupFromUSB).

Prepara��o do pendrive

Para baixar o WinSetupFromUSB, acesse http://www.datafilehost.com/download-109e97af.html

Detalhe important�ssimo.

Fa�a backup dos dados do seu pendrive, pois eles ser�o apagados, e n�o haver� como voltar atr�s ap�s a execu��o dos passos a seguir.

N�o me responsabilizo por perdas causadas pela utiliza��o deste tutorial.

Assim que fizer o download do instalador do WinSetupFromUSB, instale-o. No fim da instala��o, o programa ser� executado.

Insira o CD do Windows XP no drive de CD e o pendrive na USB.

Agora, no WinSetupFromUSB, siga os passos abaixo:

  • Para preencher o campo �Windows 2000/XP/2003 Source�, clique na bot�o Browse e localize a letra da unidade na qual o cd foi carregado (no meu caso, D:)
  • No campo �USB Disk Selection�, selecione o seu pendrive. Se ele n�o estiver aparecendo, clique no bot�o Refresh
  • Em �Force Target disk type�, selecione a op��o Fixed
  • Clique no bot�o GO e espere a prepara��o do pendrive (comigo levou aproximadamente 30 minutos, ent�o se quiser, v� tomar um caf� rs)
  • Assim que a c�pia terminar, feche o WinSetupFromUSB.

Isso � tudo para ter um pendrive preparado para instala��o do Windows XP sem um drive de CD.

Instala��o do Windows a partir do pendrive

Reinicie o computador e cofigure, atrav�s do setup do computador, a inicializa��o pela porta USB (isso varia de computador para computador, portanto, vou deixar por sua conta).

Reinicie o computador, j� com o pendrive conectado na USB e aguarde.

O GRUB dever� ser iniciado, apresentando uma lista com 2 op��es para sele��o.

Como estamos no in�cio da instala��o, selecione a primeira op��o, e a instala��o come�ar�. A instala��o do Windows XP ser� iniciada aqui como de costume. Se voc� n�o souber como prosseguir, aconselho uma busca no Google, pois este tutorial n�o tem o objetivo de descrever a instala��o em si.

Uma vez que a instala��o esteja completa, o computador ser� reiniciado. Assim que isso acontecer, na mesma lista de op��es exibida pelo GRUB, selecione a segunda op��o, para que o Windows seja iniciado a partir do HD e a instala��o seja conclu�da.

Quando a instala��o estiver conclu�da, reinicie novamente o computador e remova o pendrive da USB.

Isso � tudo que voc� precisa para ter o Windows XP instalado e funcionando no seu netbook.

Boa sorte, e se tiver qualquer d�vida ou sugest�o, me avise pelos coment�rios.

Por hoje � s�.

Abra�o

Refer�ncia

Kioskea.net

{ Read More }


Monday, 15 May 2017

Create Shut down Restart Log off shortcut in Windows XP

Create Shut down Restart Log off shortcut in Windows XP


shutdown shortcut

Windows XP has a program called Shutdown.exe that lets you easily create icons to shutdown or restart the computer.

To create a shortcut to the shutdown:

Right-click an empty area of the desktop
Select New / Shortcut
Enter in "shutdown -s -t 00" - no quotes (For Shut Down)
Click the Next button
For the name, type in whatever you want. Just use the shutdown. Click the Finish button.

To restart the system, type "shutdown -r -t 00"
For log off, type "shutdown -l -t 00"


Shutdown [{-l |-s |-r |-a}] [-f] [-m [ computer]] [-t xx] [-c "message"] [-d [u] [p] : xx: yy]

Parameters

-L - Logs off the current user, this is also the defualt. -M computer name has priority.
-S - Turn off the local computer.
-R - Restart after shutdown.
-A - Aborts shutdown. Ignores other parameters, except-l and ComputerName. Can only be used during the period, a timeout.
-F - Forces running applications to close.
-M [ computer] - Specifies the computer that you want to stop.
-T xx - Sets the timer for system shutdown in xx seconds. The default is 20 seconds.
-C "message" - Specifies a message to be displayed in the Message window closing system. You can use a maximum of 127 characters. You must enclose the message in quotes.

(You can try this trick in any next version of  Windows. It may work but not so sure.)
{ Read More }


Create timer for non windows application in C in which long process is run

Create timer for non windows application in C in which long process is run


There are times when we need to create a timer for our codes, this can be done by following some simple structure like the following:

using System.Threading;

public class WebCrawler
{
private Timer mTimer;

public void Start()
{
mTimer = new Timer(OnTimerTicked, null, 0, 100);
}

public void Stop()
{
mTimer.Change(Timeout.Infinite, Timeout.Infinite);
}

private void OnTimerTicked(object state)
{
DoSomethingLong();
}
}


The problem is the operation implemented in OnTimerTicked may take more than the timer interval (which is 100 milliseconds in the above example) to run. This is not desired as it may lead to memory corruption. The simple way to work around this is to fire the timer only once at the start, which will then invoke OnTimerTicked callback function, at the end of the OnTimerTicked callback, the timer can be reinvoked by calling its change() method, until flag change which cancel the timers ticked operation. This is shown in the following code.

using System.Threading;

public class WebCrawler
{
private Timer mTimer;
private bool mIsWorking;

public void Start()
{
mIsWorking=true;
mTimer = new Timer(OnTimerTicked, null, 0, 100);
}

public void Stop()
{
mIsWorking = false;
mTimer.Change(Timeout.Infinite, Timeout.Infinite);
}

private void OnTimerTicked(object state)
{
if(mIsWorking)
{
DoSomethingLong();
mTimer.Change(100, Timeout.Infinite);
}
}
}

{ Read More }


Sunday, 7 May 2017

Create New User Account in Windows Server 2008

Create New User Account in Windows Server 2008


The steps for creating Local User Account and Domain User Account (if the server is an Active Directory Domain Controller) in the Windows Server 2008 Operating System.

Local User Account
Step 1:Click Start -> Administrative Tools -> Computer Management
Step 2:In Computer Management, click Local Users and group
Step 3:Double click the Users folder
Step 4:Right click in the users list and click New User
Step 5:Fill the information for the new user and click create and close.

Domain User Account
Step 1:Click Start, select Administrative Tools and click Active Directory Users and Computers.
Step 2:In Active Directory Users and Computers, navigate to the folder where you want to store the new user.
 Step 3:Right in click the user list and click New User.
Step 4:Fill in the new user information and click Next.
Step 5:Fill in the password information and click Next.
{ Read More }


Friday, 28 April 2017

Counter Strike Extreme V5 Pc Mediafire Windows

Counter Strike Extreme V5 Pc Mediafire Windows


Counter strike merupakan game Fps yang sangat seru.dengan semua senjata dan musuh-musuh tangguhnya counter strike menjadi game yang memiliki ciri khas yang mendalam pada setiap gamer.Setelah dulu saya pernah post tentang counter strike condition zero ,sekarang saya akan membahas Counter Strike Extreme yang V5 (versi 5).Walaupun telah hadir counter strike versi 6 namun hanya sedikit perubahan,jadi tidak masalah bukan ?


KLIK GAMBAR DIBAWAH INI UNTUK MENDOWNLOAD

http://www.mediafire.com/?74j166sbcldbx 
 
 http://www.mediafire.com/?74j166sbcldbx
Pass : alisoftware
From : www.catatanmathin.blogspot.com
Dan Patch Untuk menambahkan Map
http://www.mediafire.com/?o0qrs10ej07eei8 
OR
From : http://araya19.blogspot.com/2011/08/counter-strike-xtreme-v5-free-download.html
Counter Strike Xtreme V5 part1 | 200 Mb
Counter Strike Xtreme V5 part2 | 200 Mb
Counter Strike Xtreme V5 part3 | 200 Mb
Counter Strike Xtreme V5 part4 | 200 Mb
Counter Strike Xtreme V5 part5 | 35 Mb

Password : Www.net4Download.com / www.Net4Download.com  
Cara Install :
 Move In One Folder.
Right click on Part 1 And select extack here.
click On setup .exe
Penting !!!
Game ini tidak akan berjalan tanpa mscomtl.ocx.
Download mscomtl.ocx 
Copy mscomtl.ocx ke C : windows/system32.
 Restart your game and Play. 
{ Read More }