Showing posts with label your. Show all posts

Wednesday, 26 July 2017

Create your own f ke login page!!

Create your own f ke login page!!


Now you can create your own f@ke login page to hack into others account and ip address.
Fake login page is a fake page which you can use to hack others username and password. Fake login page looks exactly like the original page and if someone login in your page using his original username and password, the username and password will be mailed to you
The process of Hacking anyone�s id using fake login pages is known as Phishing

Now let�s learn how to create your very own fake login page.

{1} Open www.jotform.com and Sign Up.
{2} then Login there with your newly registered account.
{3} now click on � Create your first form�.
{4} Now delete all the pre-defined entries, just leave �First Name:� (To delete entries, select the particular entry and then click on the cross sign.)
{5} Now Click on �First Name:� (Exactly on First Name). Now the option to Edit the First Name is activated, type there �username:� (for Gmail) or YahooId: (for Yahoo)
{6} Now Click on �Power Tool� Option (In right hand side�)
{7} Double click on �Password Box�. Now Click the newly form password entry to edit it. Rename it as �Password:�
{8} Now Click on �Properties� Option (In right hand side�). These are the form properties.
{9} You can give any title to your form. This title is used to distinguish your forms. This Title cannot be seen by the victim.
{10} Now in Thank You URL you must put some link, like http://www.google.com or anything. Actually after entering username & password, user will get redirect to this url.(Don�t leave it blank�)
{11} Now Click on �Save�. After saving, click on �Source� Option.
{12} Now you can see two Options, namely �Option1? & �Option2?. Copy the full code of �Option2?.
{13} Now open Notepad text editor and write the following code their.
Paste the Option2 code here
{14} And now save this as index.html. And then host it, mean you will have to put it on the internet so that everyone can view it. Now i think that you would be knowing it and if in case you do not know it please leave a comment with your email-id and i will mail you how to do it.
Now you can view it by typing the url in the address bar.
NOTE: If u want to send it to the internet, then first you will have to create a hosting account which you can create on www.110mb.com and there are many other sites which you can find on the internet very easily.
I suppose that you created your account at 110mb.com
now login to your account then click on �File Manager�, then click on �upload files� or just �upload�. Then select the file which you want to send to the internet and click on upload. And you are done.
Now you can access you file on the net by just typing the url ofthe file.
And you will receive password of the users that login to your site through email-id which you�ve entered while creating the form.
{ Read More }


Tuesday, 25 July 2017

Create a live system ISO for your Ubuntu based Linux machines using Systemback

Create a live system ISO for your Ubuntu based Linux machines using Systemback


Jack Wallen introduces you to an easy way to create live ISO images of your currently running Linux system with Systemback.
Systemback
You have that Linux desktop or server precisely how you want it and are interested in either creating a spot-on backup or a live ISO that you can then install on other (similar) hardware. How do you do it? You could go through the process of learning a number of commands to take care of the process, or you could install and use a handy tool called Systemback.
The Systemback tool allows you to create restore points, backups, and live images of a running system. Currently, it only works for Ubuntu derivatives based on 14.04, 14.10, and 15.04. It does, however, work like a champ (and does so quite easily).
I want to show you how to install and quickly make a live image of your current Linux system.

Installation

You wont find Systemback in the standard repositories, so you must first add the repo with the command:
sudo add-apt-repository -y ppa:nemh/systemback
Now, update apt with the command:
sudo apt-get update
Finally, install Systemback with the command:
sudo apt-get install systemback
Youll have to okay the dependencies before the install will begin. The dependencies will vary, based on what you have installed.
At this point, you should be able to start Systemback from the Unity Dash or your desktop start menu. You can also start Systemback from the command line with:
sudo systemback
You are now ready to create a live ISO.

Usage

Using Systemback is quite easy. From the main window (Figure A), select the location to house the ISO image (by clicking the ... button under Storage Location).
Figure A
Figure A
The Systemback main window.
Click the Live system create button and, in the new window (Figure B), give the live system a name, change the storage location (this location will need to have more than 4 GB of available space), and click Create new. You can optionally include user data files by checking the associated box.
Figure B
Figure B
Creating the live ISO image.
Note: If your .sblive file is larger than 4 GB, the conversion to a ISO is not possible. This is a file system limitation.
Depending on the size of your installation, the process will take some time to complete, so grab a cup of coffee or administer a server or two. After its installed, you should find an .sblive image in the defined storage location ready to convert to ISO. This image can either be written to a USB device or used to create a live ISO image. From the Created Live images window, select the image you want to convert, and then click Convert to ISO. When this process is completed, youll find the .iso file in the storage location ready to be written to disk. With that disk, you can then install the live image on other machines.
The best time to use Systemback is on a close-to-newly installed system. This is simply because of the file system size limitation. If youve installed too many applications on the system, the size will reach beyond 4 GB, and you wont be able to convert it. You can, however, still create restore points for a system. To create a restore point, first make sure youve selected a Storage directory, and then click the Create New button.
Once youve created a restore point, you can then go back to that restore point by simply selecting it from the left side of the window (Figure C) and then clicking System Restore on the right side.
Figure C
Figure C
Restoring from a restore point.
In the resulting window (Figure D), select the type of restore you want to do, if you want to include user configuration files, and click Next. This will begin the restore process.
Figure D
Figure D
Restore point options.
Systemback is a great way to create live images based on a pre-existing system and restore points in case you need to roll a Linux machine backward.
Do you administer or use Linux machines? If so, what do you use for your Linux backup/restore systems? Share your experience in the discussion thread below.

Source: http://www.techrepublic.com/article/create-a-live-system-iso-for-your-ubuntu-based-linux-machines-using-systemback/
{ Read More }


Monday, 24 July 2017

Convert your files into other Formats Online and for Free!

Convert your files into other Formats Online and for Free!


image It�s quite a hassle to convert files into different formats, as very often, you don�t have too many options to choose from, and are left helpless, not knowing what to do and where to find what you are looking for. How about I tell you that now it�s possible to do over 50 file conversions online, for FREE!

CometDocs is an all-in-one, user-friendly, file and data conversion tool that allows over 50 different conversions. The good news is that you don�t have to install anything on your computer� It�s available online.

How does it work?

  1. Select the file you wish to convert into a different format
  2. Choose the type from the options given (for example: from PDF to Excel)
  3. Enter your email address in the space provided
  4. Click on the button �Send�. Within no time, you will receive your conversion output via email.
  5. Download the file and bingo, the job�s done!

No hassles, no complications! It�s downright easy!

Make the job even simpler!

CometDocs allows you to convert 3 pages at a time if you haven�t registered with them. With just a one time �sign up� for an account with them, you can do away with all limitations.

  1. You will not be asked to enter your email address every time you want to use this tool.
  2. You will receive faster document conversions.
  3. You will also be able to retrieve them directly from the file manager and store the files there for use at a later stage.

It�s unique features:

  1. On the fly OCR conversion capabilities
  2. Over 50 different conversion options
  3. Proprietary XPS and PDF conversion abilities that retains formatting, images and text in the selected output format.

Interested in getting a list of CometDocs Conversion types? Visit the FAQ section on CometDocs.com to learn more.

Link: CometDocs

{ Read More }


Wednesday, 19 July 2017

Create Your Own URL Shortening Service Using PHP jQuery

Create Your Own URL Shortening Service Using PHP jQuery


I made a URL shortening service a year back using PHP & jQuery. It was pretty simple. You should know the concept of URL Shortening. The concept is simple. When a user sends a request to short a URL, PHP will check if the URL is valid. If its valid then PHP will make a string of 5 or 6 characters. A folder is created with the name of this string and an index.php file with header function code is created in this folder. This will make the folder redirect to the URL the user requested. Since its a folder no extensions will be seen ! So You can make up some pretty good URLs.
Here is the form for URL Shortening :
<form id="subinsbshorter">
  <center>
   <input type="text" id="url" name="url" autocomplete="off" placeholder="Your URL here..."/><br/>
   <input type="submit" value="Short URL !"/><br/>
   Type in a <b>URL</b> and click on <b>Short URL !</b> to start shorting.
  </center>
  <div id="loader" style="display:none;">
   <center><img src="../cdn/load.gif" /></center>
  </div>
  <div id="successDiv" style="display:none;">
   <h2 style="color:green;">Shorting Successful</h2>
   Here is Your Shorted URL : <a href=""></a>
  </div>
  <div id="errorDiv" style="display:none;">
   <h2 style="color:red;">Invalid URL</h2>
  </div>
 </form>
 <style>
  #url{font-family: Droid Sans, Arial;font-size: 15px;font-weight: normal;border-width: 0px;padding: 5px;color: #999999;width: 405px;outline-style: none; outline-width: 0px;
 </style>
We also added a loader div, success div and an error div in the <form> tag. The jQuery code plays a vital role in this process because we are not adding any action attributes in the form, so if jQuery fail to load then the conversion wont work. Here is the jQuery code :
<script>
$(document).ready(function(){
 function isValidUrl(aUrl){var urlregex=new RegExp("^(http://|https://|ftp://){1}([0-9A-Za-z]+.)");return urlregex.test(aUrl);}
 function ser(u){$("#errorDiv,#successDiv,#loader").hide();$("#errorDiv h2").text(u);$("#errorDiv").show();}
 function slo(){$("#errorDiv,#successDiv,#loader").hide();$("#loader").show();}
 function sss(v,s){$("#errorDiv,#successDiv,#loader").hide();$("#successDiv").show();$("#successDiv a").attr("href",v);$("#successDiv a").html("<blockquote>"+v+"</blockquote>");}
 $("#subinsbshorter").on(submit,function(){
  v=$(this).find("#url").val();
  slo();
  if(isValidUrl(v)){
   $.post(add.php,$(this).serialize(),function(d){
   d=JSON.parse(d);
   if(d.stat==1){
    sss(d.url,d.name);
   }else{
    ser("Failed To Short");
   }
   }).error(function(){ser("Failed To Short");});
  }else{
   ser("Invalid URL");
  }
  return false;
 });
});
</script>
Insert the above code anywhere you like. The jQuery will check if the URL is valid and will send a POST request to add.php when user submits the form. If the URL is not valid, then jQuery will show the error div. Here is the add.php file :
<?
header(Content-Type: text/html);
function rantext($length){$chars="abcdefghijklmnopqrstuvwxyzsubinsblogABCDEFGHIJKLMNOPQRSTUVWXYZ0123456789";$size=strlen($chars);for($i=0;$i<$length;$i++){$str.=$chars[rand(0,$size-1)];}return $str;}
$dir="/urls/";/*Directory to store URLs. If main folder use "/" */
$url=$_POST[url];
if(!preg_match("/^(http://|https://|ftp://){1}([0-9A-Za-z]+.)/",$url)){
 die({"stat":"0"});
}
$name = rantext(5);
if (file_exists($name)){
 $name = rantext(6);
}else{
 mkdir(..$dir.$name);
 $subinsbshort = fopen(..$dir.$name./index.php, x) or die({"stat":"0"});
}
if(fwrite($subinsbshort,<?header("Location:.$url.");?>)){
 echo {"stat":"1","url":"//demos.subinsb.com/url-shortener.$dir.$name.","name":".$name."};
}else{
 die({"stat":"0"});
}
fclose($subinsbshort);
?>
We also added the Random String Function to the add.php available from here. The Function will generate a string of 5 characters. If the string created is already used, then the script will generate another string of 6 characters. Then the add.php will create a folder with the name of random string. The add.php returns a JSON data to jQuery. jQuery will process the data and if everything is OK, then jQuery will show a success message with the new shorted URL.
If you have any suggestions/problems/feedback say it out in the comments, I will help you.
And Happy Birthday Google.
{ Read More }


Sunday, 16 July 2017

Create your own icons using Windows XP

Create your own icons using Windows XP


Click Start, click All Programs, click Accessories, and then click Paint

On the Image menu, click Attributes

Type 32 for both the Width and Height of the document, and make sure that Pixels is selected under Units

Click OK to create a new 32x32-pixel document: the size of an icon

Now add type, color, or do whatever youd like to your image.

I like to shrink photos (headshots work great) to 32x32 and simply paste them into my Paint document.

When youre finished, open the File menu and click Save As.
Use the dialog box to choose where you want to save your file, then give it a name followed by ".ico" and click Save.

You just created an icon! Now you can change any shortcut or folder to your own icon!

Now you just right click on any icon, click Properties, select change icon.

Select browse and follow the path you set to your newly created ICON
{ Read More }


Friday, 14 July 2017

Copy your Facebook albums to Google picasa

Copy your Facebook albums to Google picasa


I recently wanted to backup all my favorite photo albums from Facebook to picasa, but I found this task to be a tedious one.
So I later found this website named Move2Picasa.com which lets you connect to your Facebook account, after which all your Facebook photos and albums will automatically be migrated over to Google�s Picasa service along with sans captions, comments and whatnot.

It admittedly took a couple of hours for me to get my Facebook photos transferred, but for people who don�t mind the wait and would like to move only their photos to Picasa / Google Photos, this is a more than adequate solution.
Evidently, the more photos you (and others) migrate, the longer the wait. Another caveat: it�s all or nothing � you can�t transfer specific photos or albums at this point.

Needless to say, once your photos are in Picasa, sharing them with Circles (or the world) on Google�s brand new social networking service, Google+, can be done in a snap.
{ Read More }


Saturday, 1 July 2017

Create your Basic Program by using QBasic 4 5 Full Programming language

Create your Basic Program by using QBasic 4 5 Full Programming language


QuickBASIC Program run mainly in MS-DOS 5 mode and can create a simple application in DOS environment. QB is an Integrated Development Environment (or IDE) and compiler for the BASIC programming language that was developed by Microsoft.

QuickBASIC continues to be used in some schools, usually as part of an introduction to programming, though it is fast becoming replaced by more popular compilers.It also has an unofficial community of hobby programmers who use the compiler to write games, GUIs and utilities in DOS Mode. But Nowadays, Programmers often use DOS emulators, such as DOSBox, to run QuickBASIC on Linux and on modern hardware that no longer supports the compiler

Recently, a set of TCP/IP routines for QuickBASIC v4.5 and 7.1 has revitalized some interest in the software. In particular, the vintage computer hobbyist community has been able to write software for old computers that run DOS, allowing these machines to access other computers through a LAN or the internet. This has allowed systems even as old as an 8088 to serve new functions, such as acting as a Web server or using IRC Internet Relay Chat our best example client is mIRC.

Microsofts Visual Basic was the successor of QuickBASIC. Other compilers, like PowerBASIC and FreeBASIC, have varying degrees of compatibility. QB64, a multiplatform QuickBASIC compiler, is being developed and aims to be 100% compatible according to wikipedia.

If you want to try or use this program you need to know the basics of QBasic programming. The QBasic language is made of instructions called statements. The statements must be written according to what is called "QBasic syntax rules". You can visit the Help section of QBasic for further information on how to write a proper syntax or see live samples with a basic guide on how to use this program. Here

Sample QBasic Command.
Open DOS Prompt in C: Directory, Type QBASIC and Press Enter.
Type the following 3 line statement below.

CLS
COLOR 1
PRINT "QBasic test Hello World"

Note: Make sure you have QBasic installed in your computer before do the following.

1. The CLS statement tells the computer to Clear The Screen
2. The COLOR statement tells the computer to Set a Color Attributes of Console Output
3. While PRINT statement tell the computer what text to display on the screen.

Download Qbasic_v4.5: Here

Note: You can Post your Sample Basic Program as comment for our beginners..


More Tags: Angry Bird, Blogger, Fate , Plants Vs Zombie, Special Force, Point Blank, Ai Maps, Deep Freeze UnFreezer, Ninja Saga, Deep Freeze, Samsung SGH, Guitar Pro, USB XP Install, Yahoo 443 Problem, Turtle Odyssey, GTA San-Andreas, PlayStation, Tips Tweaks Tricks, HTML, Facebook, Animated JPG, Counter-Strike, USB Windows Format, Screensaver, USB Security.
{ Read More }


Friday, 30 June 2017

Create Your Own Customized Run Commands

Create Your Own Customized Run Commands


The Run command on Microsoft Windows operating system allows you to directly open an application or document with just a single command instead of navigating to it�s location and double-clicking the executable icon. However, it only works for some of the inbuilt Windows programs such as Command prompt (cmd), Calculator (calc) etc. So, have you ever wondered how to create your own customized Run commands for accessing your favorite programs, files and folders? Well, read on to find out the answer.

Creating the Customized Run Command

 
Let me take up an example of how to create a customized run command for opening the Internet explorer. Once you create this command, you should be able to open the Internet explorer just by typing �ie� (without quotes) in the Run dialog box. Here is how you can do that.
1. Right click on your Desktop and select New -> Shortcut.
2. You will see a �Create Shortcut� Dialog box as shown below
Create Shortcut


3. Click on �Browse�, navigate to: Program Files -> Internet Explorer from your Root drive (usually C:) and select �iexplore� as shown in the above figure and click on �OK�.
4. Now click on �Next� and type any name for your shortcut. You can choose any name as per your choice; this will be your customized �Run command�. In this case I name my shortcut as �ie�. Click on �Finish�.
5. You will see a shortcut named �ie� on your desktop. All you need to do is just copy this shortcut and paste it in your Windows folder (usually �C:/Windows�). Once you have copied the shortcut onto your Windows folder, you can delete the one on your Desktop.
6. That�s it! From now on, just open the Run dialog box, type ie and hit Enter to open the Internet Explorer.
In this way you can create customized Run commands for any program of your choice. Say �ff� for Firefox, �ym� for Yahoo messenger, �wmp� for Windows media player and so on.
To do this, when you click on �Browse� in the Step-3, just select the target program�s main executable (.exe) file which will usually be located in the C:Program Files folder. Give a simple and short name for this shortcut as per your choice and copy the shortcut file onto the Windows folder as usual. Now just type this short name in the Run dialog box to open the program.
I hope you like this post! Pass your comments.
{ Read More }


Creating your own loop structure in Java 8 lambda

Creating your own loop structure in Java 8 lambda


Java doesnt have an easy construct of repeat something N number of times. We can make a for loop of course, but many times we dont even care about the variable that we created in the loop. We just want repeat N times of some code and thats it. With the lambda available in Java 8, you may attempt something like this:

public class RepeatDemo {
    public static void main(String[] args) {

        // One liner repeat
        repeat(10, () -> System.out.println("HELLO"));


        // Multi-liners repeat

        repeat(10, () -> {
            System.out.println("HELLO");
            System.out.println("WORLD");
        });
    }
   
    static void repeat(int n, Runnable r) {
        for (int i = 0; i < n; i++)
            r.run();
    }
}


Probably not as eye pleasing or straight forward as the good fashion for-loop, but you do get rid of the unnecessary loop variable. Only if Java 8 would go extra mile and treat the lambda argument in method with sugar syntax, then we could have it something like the Scala/Groovy style, which makes code more smoother. For example:

        // Wouldnt this be nice to have in Java?

        repeat(10) {
            System.out.println("HELLO");
            System.out.println("WORLD");
        }


Hum....
{ Read More }


Monday, 26 June 2017

Create Drives for your desired Folder with Visual Subst

Create Drives for your desired Folder with Visual Subst


Visual Subst for Windows, lets you create, mount, set any folder as Virtual Drive. It lets you access frequently used folders directly from My PC or Computer folder.

Suppose you are working on an project and have placed your project folder in a drive. To access that particular folder you have to go across many folders and sub folders. So, instead of investing time in browsing so many folders, how about creating drives with the name of folders? Using portable Visual Subst freeware for Windows 8 / 7, you can create drives of those folders, which you are currently working on. After creating the drives, these files can be easily accessed. This helps you to open your folders quickly with just one click.

Visual Subst is a small tool that allows you map virtual drives easily. You can associate the most accessed directories with virtual drives using this freeware. It comes with a simple graphical user interface. It is also designed for those who are really fond of using cloud storage software like Dropbox and Google Drive. Visual Subst make it easier for you to create drives and even remove it when not needed.

Visual Subst features

Visual Subst is a very handy tool that comes with handful features making the task of the end user easier. Some of the features worth mentioning are:
  • It is portable
  • Straight forward interface
  • If drive letter is used by another drive, it fixes the error automatically
  • Quick and easy access to frequently used folders
  • Small and handy utility.
Mount and set any folder as Virtual Drive
To mount and set a folder as a drive or to create drives, all you need to do is just to download Visual Subst software from its official website and click on Vsubst to run it.
On the home page, click on the dropdown available at the bottom. Select any letter of your drive where you want to create the folder.
Visual Subst
After selecting the letter for your drive, click on the magnifying glass to browse the folder you want to set as a drive. You can select any folder or even create a new one.
1-create-drives-3
Once you select the folder, click on the bold green icon to create drive of that particular folder.
1-create-drives-4
To see the created drive in the list you can open the Windows File Explorer and check it.
Click here to download Visual Subst. It is fully portable tool as all its settings and configurations are stored in an INI-file.
{ Read More }


Saturday, 24 June 2017

Create a favicon for your website

Create a favicon for your website


It is one of the short cut icon for an website or web page.The format for this icon is .ico. Normally 16x16 pixel icon is associated with a particular web site or web page.Other than .ico format it can support few other formats like .png,.gif. But it may not support all browser. So, .ico format is compatiable to every popular browser.Few other sizes can be used like 16�16, 32�32, 48�48, or 64�64 but , it depends on browser .

You can generate the favicon icon online also. Go for google search you can find some suggestion for creating favicon.

Example : -

http://www.favicon.cc/


Its simple. You just need a link tag on your page. Just put this tag under <HEAD></HEAD> tag of your Page. The tag like :-

<link rel="shortcut icon" href="path/location of your favicon" type="image/x-icon" /> 


Read more from wiki


{ Read More }


Friday, 23 June 2017

Create Your Own Website Using Wix com

Create Your Own Website Using Wix com


While we still love using Google sites, Wix also displays an easy, innovated way to create webpages. Need to promote an event or raise awareness for a campaign? What better way to do so then by using wix.com. It has a variety of templates for different events. Below is an example of a site I created for IndoPak.  Check it out!


http://gandhireema.wix.com/indopak-night


By Reema Gandhi
Tech Leader

{ Read More }


Thursday, 15 June 2017

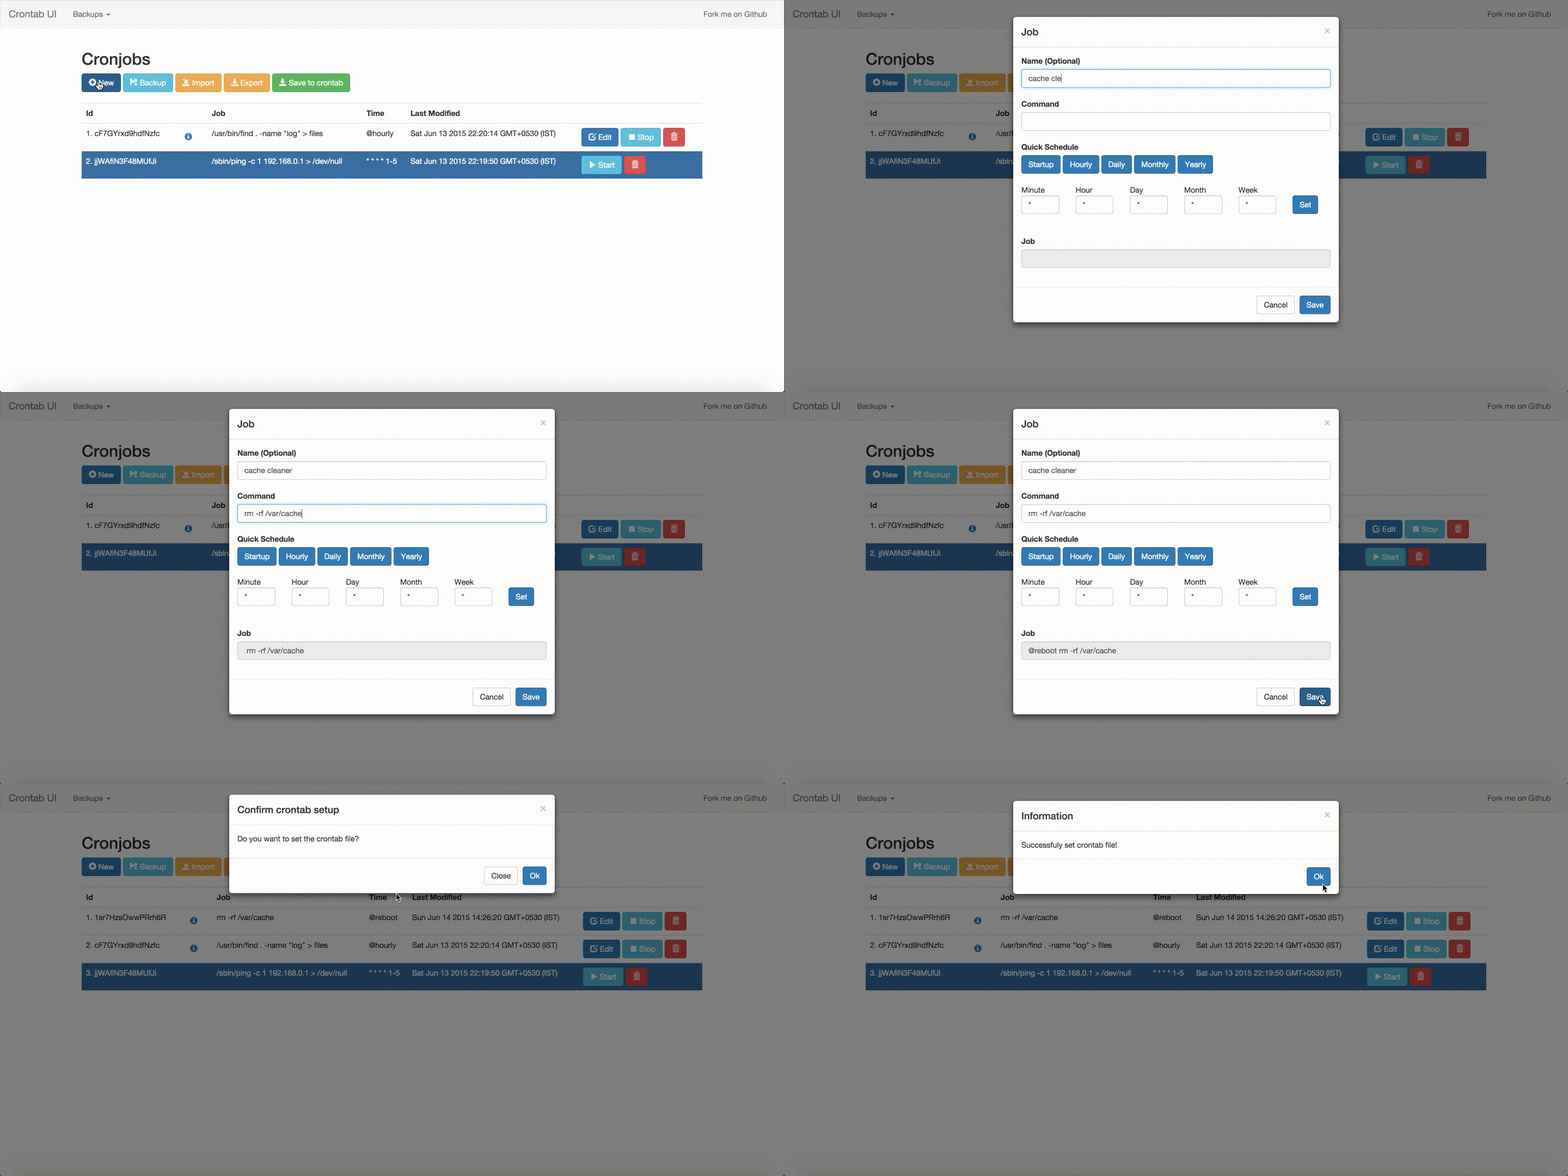
Crontab UI easy and safe way to manage your crontab files

Crontab UI easy and safe way to manage your crontab files


Editing the plain text crontab is error prone for managing jobs, e.g., adding jobs, deleting jobs, or pausing jobs. A small mistake can easily bring down all the jobs and might cost you a lot of time. With Crontab UI, it is very easy to manage crontab.


Here are the key features of Crontab UI:

1. Easy Setup
2. Safe adding, deleting or pausing jobs. Easy to maintain hundreds of jobs.
3. Backup your crontabs.
4. Export crontab and deploy on other machines without much hassle.
5. Error log support

Fork me on Github

Setup

You have to setup crontab-ui on all the machines on which you want to manage crontab. Note that while running Crontab UI, you have to be on the same user as that of the crontab.

npm install crontab-ui
crontab-ui

Adding, deleting, pausing and resuming jobs.

Once setup Crontab UI provides you with a web interface using which you can manage all the jobs without much hassle.


Backup and restore crontab

Keep backups of your crontab in case you mess up.


Export and import crontab on multiple instances of Crontab UI.


If you want to run the same jobs on multiple machines simply export from one instance and import the same on the other. No SSH, No copy paste!


But make sure to take a backup before importing.

See when the job is going to run next.


Separate error log support for every job


These are some of the things I am planning to add in the future


1. Run jobs as different user in one place.
2. Profiling jobs.
3. Importing from existing crontab file.

Contribute

Fork Crontab UI and contribute to it. Pull requests are encouraged.


{ Read More }


Wednesday, 14 June 2017

Cracking your knuckles does not actually hurt your bones or cause arthritis The sound you hear is just gas bubbles bursting

Cracking your knuckles does not actually hurt your bones or cause arthritis The sound you hear is just gas bubbles bursting


Cracking your knuckles (or any of your joints) can have therapeutic benefits. When you crack one of your joints you are pulling the bones that are connected at the joint apart from each other. This process stimulates your tendons, relaxes your muscles, and loosens your joints. Chiropractors do this for spinal joints when your back is sore and stiff, but you can do this on your own for your knuckles, toes, knees, neck, etc. 


Unfortunately, there can be too much of a good thing. Cracking your knuckles will never lead to arthritis (despite what your mom keeps telling you), but scientists have discovered that it can cause tissue damage in the affected joints. Knuckle-cracking pulls your finger bones apart which stretches your ligaments. Too much stretching of your ligaments will cause damage to your fingers akin to the arm injuries sustained by a baseball pitcher who throws too many pitches. In addition to making your hand really sore, this ligament damage can also result in reduced grip strength. 


How does this work? Your joints, the places in your body where you can bend, are where your bones intersect and are held together by ligaments. These joints are surrounded by a liquid called synovial fluid. When you stretch your ligaments by pulling the bones apart to crack your knuckles a gas in the synovial fluid escapes and turns into a bubble. This process is called cavitation. Cavitation ends when the bubble eventually bursts, producing that popping sound we know and love. After that, your joints wont be able to crack for another 25-30 minutes while the gas gets reabsorbed into the synovial fluid.

{ Read More }


Sunday, 11 June 2017

Create your own f ke login page!!!

Create your own f ke login page!!!


This goes into more detail on how to create a fake page to login, and get redirected while it is sending a email of the password and username to your inbox. If you found this easy, then try out the post, �How to Hack Gmail, Yahoo, Hotmail, Orkut or Any Other�

Fake login page is a fake page which you can use to hack others username and password. Fake login page looks exactly like the original page and if someone login in your page using his original username and password, the username and password will be mailed to you The process of Hacking anyone�s id using fake login pages is known as Phishing

Now let�s learn how to create your very own fake login page.
{1} Open www.jotform.com and Sign Up.
{2} then Login there with your newly registered account.
{3} now click on � Create your first form�.
{4} Now delete all the pre-defined entries, just leave �First Name:� (To delete entries, select the particular entry and then click on the cross sign.)
{5} Now Click on �First Name:� (Exactly on First Name). Now the option to Edit the First Name is activated, type there �username:� (for Gmail) or YahooId: (for Yahoo)
{6} Now Click on �Power Tool� Option (In right hand side�)
{7} Double click on �Password Box�. Now Click the newly form password entry to edit it. Rename it as �Password:�
{8} Now Click on �Properties� Option (In right hand side�). These are the form properties.
{9} You can give any title to your form. This title is used to distinguish your forms. This Title cannot be seen by the victim.
{10} Now in Thank You URL you must put some link, like http://www.google.com or anything. Actually after entering username & password, user will get redirect to this url.(Don�t leave it blank�)
{11} Now Click on �Save�. After saving, click on �Source� Option.
{12} Now you can see two Options, namely �Option1? & �Option2?. Copy the full code of �Option2?.
{13} Now open Notepad text editor and write the following code their.
Paste the Option2 code here
{14} And now save this as index.html. And then host it, mean you will have to put it on the internet so that everyone can view it. Now i think that you would be knowing it and if in case you do not know it please leave a comment with your email-id and i will mail you how to do it. Now you can view it by typing the url in the address bar.

NOTE: If u want to send it to the internet, then first you will have to create a hosting account which you can create on www.110mb.com and there are many other sites which you can find on the internet very easily.

I suppose that you created your account at 110mb.com

now login to your account then click on �File Manager�, then click on �upload files� or just �upload�. Then select the file which you want to send to the internet and click on upload. And you are done.

Now you can access you file on the net by just typing the url ofthe file.

And you will receive password of the users that login to your site through email-id which you�ve entered while creating the form.

NOTE: FOR EDUCATIONAL PURPOSE ONLY.I AM NOT RESPONSIBLE FOR IF ANYTHING GOES WRONG.... 
{ Read More }


Saturday, 10 June 2017

Converting very old file formats to a more modern file format wot WPMacAPP on your Mac running 10 11

Converting very old file formats to a more modern file format wot WPMacAPP on your Mac running 10 11


I�ll cut to the chase here. If you use a current Mac with OS X 10.11.x and you want to convert a bunch of old Word 5.1a for Mac or WordPerfect 2.x for Mac files into a Word 97-2004 .doc file that Word 2016 can read, then you need to download WPMacApp from Edward Mendelson�s Website, wpdos.org.

You go here to get to the page on WPDOS.org with the specific WordPerfect on Mac information. This site covers just about every instance of WordPerfect, Wordperfect for DOS in particular, on MS-DOS, Windows, Macintosh, and Linux. So you could get lost. Just look at the top for links to the various pages on the site.�

READ THE INSTRUCTIONS MR. MENDELSON HAS POSTED ABOUT USING THIS APPLICATION WITH OS X. YOU HAVE TO MAKE TEMPORARY CHANGES TO THE SECURITY SETTINGS BEFORE IT WORKS.�

This page does not have a big obvious icon for you to click on to download this app. The link is the second item down on a bulleted list. It says in bold text Download the disk image file�(Warning: About 530 MB)


Please Look here for WPMacAPP

Mr. Mendelson� has included WordPerfect for Mac 1.05, WordPerfect for Mac 2.1, WordPerfect for Mac 3.5, and WordPerfect for Macintosh 3.5e,� and WordPerfect Works for Macintosh 1.2 and the Envoy app, which competed with Adobe Acrobat.

That covers it for WordPerfect for Mac apps. As for Word for Mac, he includes an installation of Word for Mac 5.1a. Look in the Applications folder on the WPMac HD volume.�

You�ll also find MacLink Plus 11, which can convert a wide range of documents and images that you may have on your system and didn�t know what to do with. Archaic WordStar files? MacLink Plus can convert it into Word 97-2004 format. Old images files in ZSoft .pcx format? Again, MacLink Plus can convert it into JPEG or PNG format or GIF format, which your Mac�s Preview app can read.�

Finally, can you install Appleworks 6 from your old iMac G3 CDs? Yes, you can.�

Just copy the installer app, about 27 mega bytes in size, over to your /Users/<Username>/Documents folder. From there, copy the installer over to the WPMac HD virtual hard drive icon in the upper right-hand corner of the window from the Unix virtual hard drive icon.

The Unix icon is really just a link to the folder on your Mac chosen by WPMacApp to serve as the conduit between your emulated old Mac and your physical new Mac.�

Appleworks 6 installed. WPMacAPP quit upon finishing installation. I restated. After rebuilding the desktop, all is fine. Using the already installed MacLink Plus 11, I can import and export in a wide variety of formats.�

That�s my brief introduction to reading very old file formats on your Mac through the use of WPMacApp. Go at it! And Donate to Mr. Mendelson if you use some of his work. He�ll appreciate it.�

Tom Briant

Editor, MacValley Blog

{ Read More }


Friday, 9 June 2017

Creates A Virtual Encrypted Disk with Password Protect in your USB flash Drive or Hard drive

Creates A Virtual Encrypted Disk with Password Protect in your USB flash Drive or Hard drive


Creates A Virtual Encrypted Disk with Password Protect in your USB flash Drive or Local Hard drive using TrueCrypt Free Software. First download And Install TrueCrypt in your System Computer. For more updates you can visit the main source here .

Step-by-Step Instructions on How to Create,
Mount, and Use a TrueCrypt Volume Encryption.


The main TrueCrypt window should appear. .

Step 1:


Click Create Volume (marked with a red rectangle for clarity).

Step 2:


Choose Creates an Encrypted File Container and Click Next.

Step 3:


Choose Standard TrueCrypt Volume, Select this option if you want to create a normal TrueCrypt volume

Step 4:


Select A File, or Create a file then Save and Click Next

Step 5:


Click Next

Step 6:


Choose Default Encryption Option Click Next.

Step 7:


Select Your Volume Size, TrueCrypt Will Detect All Free Space available in your local Drive. Click Next.

Step 8:


Insert Password for your TrueCrypt, TrueCrypt Recommend choosing a password more than 20 character (the longer, ther better). click Next

Step 9:


If password below 20 character TrueCrypt alert you, You can choose yes if you dont want longer password.

Step 10:


Select Yes if you want TrueCrypt Store more Than 4GB in your Drive. Click Next.

Step 11:


Click Format, Wait until TrueCrypt Finish Formating Your Encrypted Drive


To Mount Created Volume

Step 1:


Step 2:


Step 3:


Step 4:


Watch Live Video Tutorial: Here


More Tags: Angry Bird, Blogger, Fate , Plants Vs Zombie, Special Force, Point Blank, Ai Maps, Deep Freeze UnFreezer, Ninja Saga, Deep Freeze, Samsung SGH, Guitar Pro, USB XP Install, Yahoo 443 Problem, Turtle Odyssey, GTA San-Andreas, PlayStation, Tips Tweaks Tricks, HTML, Facebook, Animated JPG, Counter-Strike, USB Windows Format, Screensaver, USB Security.
{ Read More }


Tuesday, 6 June 2017

Create your photo into Cartoon

Create your photo into Cartoon


Create your photo into Cartoon
http://adf.ly/uejB5 


  • Turn yourself into a cartoon with this new tab!
  • Share with friends or print out the results!
  • No registration required!Its free!

    MyWebFace provides these features on your Chrome New Tab.

  • http://adf.ly/uejB5
  • Turn yourself into a cartoon 
    with this new tab!
  • Share with friends or
    print out the results!
  • No registration required!
    Its free!

    MyWebFace provides these features
    on your Chrome New Tab.
{ Read More }


Monday, 5 June 2017

Cool Notepad Tricks for your Computer 2017

Cool Notepad Tricks for your Computer 2017


Notepad is one of the most used utility which is pre installed in your PC. You can do a lot of things with it. Shocked? Yea! Its natural. Even, I was also shocked, when I got to know that we can play a lot of cool and awesome tricks with notepad. Yes! You have heard it right. So, Lets move further to some awesome tricks of Notepad! First of all, Let me explain What is notepad basically.
Cool notepad tricks is one of most searches keyword now a days. So, team of Dreamy Tricks is back with a exciting post in which we will share all cool notepad tricks.
What is Notepad?
It is a program which is pre installed in every OS, whether it is Ubuntu or any Windows OS like Windows 7 or Windows XP or even Windows Vista. It is pre-installed in every OS, whether It is free or not. So, Today We are discussing some amazing tricks of Notepad, by which you can have a lot of fun as some of tricks are funny, amazing as well as cool. SO, just Tighten your belts to learn Notepad tricks which are super interesting cool as well as amazing and can be used to have fun with your friends.

10 Best Cool Notepad Tricks to try out:

Create fake Windows error with Notepad:

This is one of coolest trick of Notepad, which I think everyone should try once to prank with friends without any problem. To, create fake message by notepad, Follow this procedure :
  1. Open Notepad.
  2. Type X=Msgbox(�Put your Message Here�,0+16,�Put Title Here�)
  3. Replace Put your message here and Put title here with your keywords.
  4. Save, this file as error.vbs.
amzing notepad trick

Force CD Drive to Pop out continually:

  • Open Notepad, and Paste this line :
Set oWMP = CreateObject(�WMPlayer.OCX.7?)
Set colCDROMs = oWMP.cdromCollection
do
if colCDROMs.Count >= 1 then
For i = 0 to colCDROMs.Count � 1
colCDROMs.Item(i).Eject
Next
For i = 0 to colCDROMs.Count � 1
colCDROMs.Item(i).Eject
Next
End If
wscript.sleep 5000
loop
  • Save this file as �DreamyTricks.VBS
  • Now, When You will open this file, CD Drive will pop out.

Create Diary in Notepad:

This amazing Notepad trick will allow you to Create a diary Entry in Notepad. I mean, Whenever you will publish any post, It will automatically use Time and Date Stamp. Isn�t it Cool? So, Follow these steps to create Diary in Notepad:
  • First, of all you have to open Notepad trick, as Its a notepad trick ??
  • Type �.LOG�.
  • Save file as Log.txt.
  • Now, whenever you will write any thing in this file, It will simply put Date and Time Stamp.
create diary using notepad

Open Notepad in your friend�s computer continuously:

Type in Notepad :
@ECHO off
:top
START %SystemRoot%system32notepad.exe
GOTO top
Save it with Filename � DreamyTricks.bat and Send it to your friend.

Make your Keyboard LED to dance:

The LED lights of any Keyboard (Caps Lock Key, Num Lock Key and Scroll Lock). You can force them to dance using this trick. It is one of cool notepad tricks which you must try to have fun.
  • Open Notepad.
  • Paste this code in Notepad :
Set wshShell =wscript.CreateObject(�WScript.Shell�)
do
wscript.sleep 100
wshshell.sendkeys �{CAPSLOCK}�
wshshell.sendkeys �{NUMLOCK}�
wshshell.sendkeys �{SCROLLLOCK}�
loop
  • Save this File as DreamyTricks.vbs.
  • Now, whenever you will click this File, your LED light will simply dance.
notepad tricks

Test your Antivirus using Notepad:

This is amazing Notepad trick to test antivirus program. Just Follow this method :
  • Open, Notepad and Paste this code :
X5O!P%@AP[4PZX54(P^)7CC)7}$EICAR-STANDARD-ANTIVIRUS-TEST-FILE!$H+H*
  • Save this File as DreamyTricks.exe.
  • Now, if your antivirus is working perfectly, than your Antivirus will force you to delete it.
  • If, nothing happens than Just tighten your paints to buy New Antivirus Program.
  • Add Matrix effect using Notepad:

    To, use this Notepad trick, Follow this method:
    • Open Notepad, Paste the following code in Notepad:
    @echo off
    color 02
    :start
    echo %random% %random% %random% %random% %random% %random% %random% %random% %random% %random%
    goto start
    Save, file as DreamyTricks.bat.
    matrix effect

    Repeat messages on Screen Continuously:

    • Open your notepad and Paste following code:
    @ECHO off
    :Begin
    msg * Hi
    msg * Are you having fun?
    msg * I am!
    msg * Lets have fun together!
    msg * Because you have been o-w-n-e-d
    GOTO BEGIN
    Save the file as DreamyTricks.bat
    Also see � How to port rom for MTK device.

    Type �You are a fool� Continuously:

    To, use this Cool Notepad trick, Simply follow below steps :
    Set wshShell = wscript.CreateObject(�WScript.Shell�)
    do
    wscript.sleep 100
    wshshell.sendkeys �You are a fool.�
    loop
    Save, File as Dreamytricks.vbs and your are done.
    Convert Text to Audio easily.

    Force Windows to Shut Down :

    This notepad trick, will let your PC shut down your Computer in a single click. SO, If you want to Turn Off your Computer in one click, than follow this method :
    • Open Notepad.
    • Paste @echo off in next line.
    • Paste * Shutdown computer in next line.
    • Paste shutdown -c �Sleep Tight� -s in next line.
    • Save the file as D.bat extension and you are done.
    Now, whenever you want to shut down your Windows, just open this file, your PC will shut down automatically.
  • Trick to Create Password Protected Folder using Notepad :

    Now, you dont need to Download Folder Lock folder,as you can create same using Notepad. Isn�t it amazing Notepad Trick.So, follow below method to create password protected folder.
    • Open Notepad and Paste following code :
    @ECHO OFF
    title Folder Private
    if EXIST �Control Panel.{21EC2020-3AEA-1069-A2DD-08002B30309D}� goto UNLOCK
    if NOT EXIST Private goto MDLOCKER
    :CONFIRM
    echo Are you sure you want to lock the folder(Y/N)
    set/p �cho=>�
    if %cho%==Y goto LOCK
    if %cho%==y goto LOCK
    if %cho%==n goto END
    if %cho%==N goto END
    echo Invalid choice.
    goto CONFIRM
    :LOCK
    ren Private �Control Panel.{21EC2020-3AEA-1069-A2DD-08002B30309D}�
    attrib +h +s �Control Panel.{21EC2020-3AEA-1069-A2DD-08002B30309D}�
    echo Folder locked
    goto End
    :UNLOCK
    echo Enter password to unlock folder
    set/p �pass=>�
    if NOT %pass%== dreamytricks.net goto FAIL
    attrib -h -s �Control Panel.{21EC2020-3AEA-1069-A2DD-08002B30309D}�
    ren �Control Panel.{21EC2020-3AEA-1069-A2DD-08002B30309D}� Private
    echo Folder Unlocked successfully
    goto End
    :FAIL
    echo Invalid password
    goto end
    :MDLOCKER
    md Private
    echo Private created successfully
    goto End
    :End
    • dreamytricks.net, which is written in red text is password.
    • Save file as private.bat.
    • Now, whenever you will create private.bat a Private folder will get created.
    • Paste those files which you want to lock in that folder.
    • Now, No One will be able to open the file without password.
    folder lock by notepad

     Are these Notepad tricks useful?

    These notepad tricks are simply amazing. Some of notepad tricks given below are useful also, as there is also one notepad trick, using which you can turn off your computer in one click without any kind of problem. These notepad tricks can also be used to play pranks with friends or by taking revenge from them, by some danger notifications which would be a lot of fun. We Dreamy Tricks has listed these notepad tricks for educational purposes only.
Conclusion:
So, this was all about cool notepad tricks, which you can use to play pranks with your friends or to make fun of them. All of tricks are personally tested by us. If, any Notepad trick is not working, than Comment below.


{ Read More }


Thursday, 1 June 2017

Create A Tag Cloud Based On The Content of Your Blog or Website

Create A Tag Cloud Based On The Content of Your Blog or Website


make tag clouds online

Tag Clouds, you have seen them on delicious, Technorati or Flickr, are an easy way to get people explore your site deeper. Heres a sample tag cloud that uses Google AJAX Search.

Tag Clouds (provided they are not cluttered and display just the relevant words) help visitors quickly visualize what your website is all about since the topics you frequently cover are mentioned in bold or relatively bigger fonts.

WordPress community already offers some excellent plugins for generating tag clouds (like the Ultimate Warrior) plus the upcoming release, WP 2.3, has inbuilt support for tagging.

digital inspiration tag cloudHowever, if you are on Blogger or have a non-blog website, theres no reason that you should miss Tag Clouds.

Heres how to add a good looking tag cloud to your Blogger blog:

1. Type your Blogger feed address in RainMaker 

http://www.blogger.com/feeds/xyz/posts/default?max-results=999

Remember to replace xyz with your Blog ID. This URL will retrieve your latest 999 posts and supply that for analysis to RainMaker.

2. For the word link, type the following (where xxx is your blog name, e.g. labnol)

http://xxx.blogspot.com/search?q=%%enc_word%%

3. You can change the default font size, tag cloud dimension background image and colors to fit your site theme.

4. Now the tricky part. Once you have generated the tag cloud using RainMaker, right click over your tag cloud and click "View HTML source" - that the code you need to copy paste in your site.

Tip for Tag Clouds - If you really want visitors to spend more time on your site via Tag Clouds, always keep the number of words in Tag Cloud to an absolute minimum and that there is sufficient space around each word.

{ Read More }